🌱 Install and Use Git
![]() Git is a free and open source distributed version control system designed to handle everything from small to very large projects with speed and efficiency. Git is easy to learn and has a tiny footprint with lightning fast performance.
Git is a free and open source distributed version control system designed to handle everything from small to very large projects with speed and efficiency. Git is easy to learn and has a tiny footprint with lightning fast performance.
This documentation details the following procedures:
- basic introduction of git
- installation of a git server on linux
- creation of an empty git repository
- installation/configuration of a git website using gitlist
🧭 Basic Git usage
📝 Basic Git commands
The default branch of Git where commits are pushed is "main".
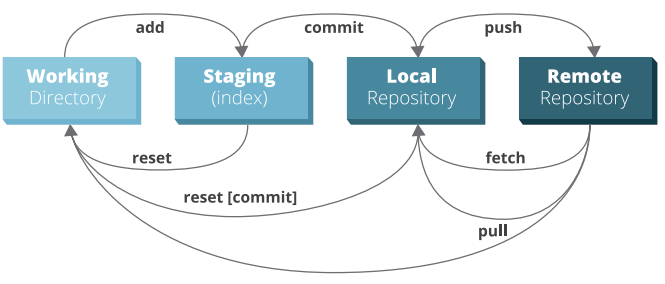
git status                              # see the current status of files for git
gitk                                    # see status graphicaly
git add files                           # add files to staging (waiting to be committed)
git add -A                              # add all files and folder to staging
git rm files                            # remove files to be committed
git restore files                       # removes the changes that weren't committed
git commit -m "message"                 # commit the files added
git branch test                         # create a branch "test"
git branch -D test                      # remove a branch "test"
git checkout test                       # switch to the branch test
Tip
To remove permanently everything that is referenced only in the reflog execute the following commands:
git reflog expire --expire-unreachable=now --all && git gc --prune=now
📚 Basic Usage
The following section explains how to create a local repository.
# quick steps to initialize a local repository
cd source-directory
git init                                        # initialize an empty local git repository
git commit -m "initial release" --allow-empty   # push an empty commit to allow full-rebase afterward
git status                                      # display the status of files in the repos

# mask all object files and binaries for status command
touch .gitignore                                # create .gitignore file
nano .gitignore                                 # edit file
    .vs
    Debug
git add .gitignore                              # add files to be committed
git commit -m "add .gitignore file"             # commit the files
git status                                      # see status
🧠 Advanced Usage
🧨 Rewrite History
It's possible to rewrite the history of the local repository using git rebase.
git rebase -i HEAD~3                            # edit history of git with the last 3 commits
git rebase -i commit^                           # edit history of git using the first 7 characters of the git hash
git rebase -i --root                            # edit history since the first commit
Usefull options
| Field | Description |
|---|---|
edit or e |
rework the commit to allow split/add/remove files |
squash or s |
merge the commit |
reword or r |
reword the name of the commit |
It's possible to add/remove/split files from a commit by resetting it's state to the previous commit:
git reset HEAD^ # reset state to the previous commit to allow add/remove/split files
🧩 Create and Apply Patches
# create a patch from a specific commit
git format-patch -1 <sha>

# create n commits from the head (here: 1)
git format-patch -1 HEAD

# get all patches of a branch
git format-patch origin/master
# apply the patch to a file
git am < file.patch
# apply the patch to a file
git am file.patch

# apply automatically all patches
Get-ChildItem -Path . -Filter "*.patch" |
  Sort-Object Name |
  ForEach-Object {
    Write-Host "Applying $($_.Name)..."
    git am $_.FullName
    if ($LASTEXITCODE -ne 0) {
      Write-Host "Failed on $($_.Name)"
      break
    }
  }
🗂️ Git LFS
🧮 Introduction
Git LFS is an open-source project and is an extension to Git. The goal is to work more efficiently with large files and binary files into your repository.
📖 Description
 Git is a distributed version control system, meaning the entire history of the repository is transferred to the client during the cloning process.
For projects containing large files, particularly large files that are modified regularly, this initial clone can take a huge amount of time, as every version of every file has to be downloaded by the client.
Git LFS (Large File Storage) is a Git extension developed by Atlassian, GitHub, and a few other open source contributors, that reduces the impact of large files in your repository by downloading the relevant versions of them lazily.
Specifically, large files are downloaded during the checkout process rather than during cloning or fetching.
Git is a distributed version control system, meaning the entire history of the repository is transferred to the client during the cloning process.
For projects containing large files, particularly large files that are modified regularly, this initial clone can take a huge amount of time, as every version of every file has to be downloaded by the client.
Git LFS (Large File Storage) is a Git extension developed by Atlassian, GitHub, and a few other open source contributors, that reduces the impact of large files in your repository by downloading the relevant versions of them lazily.
Specifically, large files are downloaded during the checkout process rather than during cloning or fetching.
Git LFS does this by replacing large files in your repository with tiny pointer files. During normal usage, you'll never see these pointer files as they are handled automatically by Git LFS. When a Git LFS file is pulled to your local repository, the file is sent through a filter which will replace the pointer with the actual file. The actual files are located on the remote server and the pulled actual files are located in a cache in your local repository. This means that your local repository will be limited in size, but the remote repository of course will contain all the actual files and differences.
📦 Installation
The Git LFS extension should be automatically installed with Git.
sudo apt install git-lfs
🏷️ Create a Git LFS repository
# initialize a git repository
mkdir <dir> && cd <dir>
git init
git commit --allow-empty -m "initial release"

# initialize git-lfs in this repository
git lfs install
# tracking binary files
git lfs track '*.exe'
git lfs track '*.dll'

# see a list of all patterns currently being tracked by git-lfs
git lfs track

# see the list of tracked binary files by git-lfs
git lfs ls-files

# push the .gitattributes
git add .gitattributes
git commit -m "activate git-lfs by tracking files and pushing .gitattributes"
# remove permanently everything in git lfs that is referenced only in the reflog
git lfs prune
Tracking files using lfs
Don't forget to track files using git lfs track '*.xxx' after the git lfs install then commit the .gitattributes file.
🖧 Install Git server
This guide explains how to set up a Git server accessible over HTTPS for cloning and pushing to bare repositories.
For example:
https://git.domain.fr/repo.git
On Debian systems, a common and lightweight setup relies on:
- nginx — handles HTTPS (TLS) and authentication
- git-http-backend — Git’s Smart HTTP backend providing repository access
- fcgiwrap — executes CGI programs for nginx
This combination allows secure Git operations over standard HTTPS without requiring SSH access.
# install required packages
sudo apt update
sudo apt install nginx fcgiwrap git git-core

# enable fcgiwrap
sudo systemctl enable --now fcgiwrap
⚠️ Disable Git safety check
Git includes a security feature that prevents operations in repositories owned by a different user. This helps protect against executing Git commands in directories that may have been modified by another account.
On systems where repositories are intentionally shared between users, this protection may block normal Git operations. If the machine is fully under your control and repositories are trusted, you can add the specific repository path to the safe list:
git config --global --add safe.directory /media/ssd/git
Warning
/media/ssd/git # ← change this to your path
Avoid using '*' as the value: it disables the ownership check for every directory on the system, which removes protection against privilege escalation attacks.
Always specify the exact repository path instead.
📁 Create empty Git repository
With Git Smart HTTP over HTTPS, repository operations are executed by the web server process (www-data when using nginx + fcgiwrap).
As a result, objects created during pushes will be owned by www-data unless permissions are configured to allow shared access.
To allow collaborative access, we add www-data to the debian group and configure the repository directory so that new files inherit this group.
# allow the web server to share repository permissions
sudo usermod -aG debian www-data

# path where Git repositories will be stored
GIT_REPOS=/media/ssd/git

# check that git repository is set
[ -n "${GIT_REPOS}" ] && [ -d "${GIT_REPOS}" ] || { echo "Invalid git repository directory: ${GIT_REPOS}"; exit 1; }

# create the repository root and initialize a bare repository
mkdir -p "${GIT_REPOS}"
cd "${GIT_REPOS}"
git init --bare

# enable pushes over HTTP for each bare repo
sudo -u www-data git config core.sharedRepository group
sudo -u www-data git config http.receivepack true   # explicitly enables write (push) access over HTTP

# ensure proper ownership and shared permissions
# dirs 2770 / files 0660: owner (www-data) and group (debian) only — "others"
# (every podman service user and container subuid) get no access at all.
# hooks/ files are excluded from the 0660 flattening: git silently skips a
# non-executable hook, so real hooks keep 0770 even when this pass is re-run
sudo chown -R www-data:debian "${GIT_REPOS}"
sudo find "${GIT_REPOS}" -type d -exec chmod 2770 {} +
sudo find "${GIT_REPOS}" -type f ! -path '*/hooks/*' -exec chmod 0660 {} +
sudo find "${GIT_REPOS}" -type f -path '*/hooks/*' ! -name '*.sample' -exec chmod 0770 {} +

# future content: pushes create new objects as www-data; the default ACL
# pins o::- so they come out group-shared, never world-readable
sudo find "${GIT_REPOS}" -type d -exec setfacl -d -m o::- {} +
Note:
2770enables the setgid bit on directories so newly created files and directories automatically inherit thedebiangroup, while the empty "other" bits deny access to every account that is neitherwww-data(nginx, fcgiwrap, hooks) nor a member ofdebian— in particular the podman service users and their container subuids. Then reload services later (nginx/fcgiwrap) so group membership is picked up.
Adapt to your setup
Update the GIT_REPOS variable at the top of the script to match your desired repository storage path:
GIT_REPOS=/media/ssd/git # ← change this to your path
Also replace debian with your actual admin user's primary group if it differs.
🌐 nginx Git HTTPS setup
Install NGINX
NGINX needs to be installed, follow the NGINX section.
Configure NGINX
NGINX needs to be configured using a file in /etc/nginx/sites-enabled directory.
This configuration file specify the documentation path:
server {
  server_name git.domain.fr;

  # setup 404 error_page
  error_page 404 /404.html;
  include snippets/error-404.conf;

  # --- Authentication ---
  auth_basic "Git";
  auth_basic_user_file /etc/nginx/.htpasswd;

  # where your bare repos live
  set $git_root /media/ssd/git;

  # for large pushes/clones (set a reasonable upper bound to prevent abuse)
  client_max_body_size 1G;
  client_body_timeout 300s;
  client_header_timeout 300s;
  send_timeout 300s;

  # only forward Git smart-HTTP endpoints to git-http-backend
  location ~ ^/.+\.git/(info/refs|git-(upload|receive)-pack)$ {
    include fastcgi_params;
    fastcgi_param SCRIPT_FILENAME /usr/lib/git-core/git-http-backend;
    fastcgi_param GIT_PROJECT_ROOT $git_root;
    fastcgi_param GIT_HTTP_EXPORT_ALL "";
    fastcgi_param PATH_INFO $uri;
    fastcgi_param REMOTE_USER $remote_user;
    fastcgi_pass unix:/run/fcgiwrap.socket;

    fastcgi_read_timeout 300s;
    fastcgi_buffering off;
  }

  # everything else: 404
  location / { return 404; }
}
# restart NGINX
sudo nginx -t && sudo service nginx restart
Replace
git.domain.frby the name of your website.
Activate HTTPS
To activate HTTPS protocol, follow the Let's Encrypt section.
🔐 Configure HTTPS Basic Auth
# install htpasswd utility (provided by apache2-utils)
sudo apt install apache2-utils

# create the credentials file and add the first user (-c creates the file)
# NOTE: "git" here is an HTTP Basic Auth username (stored in .htpasswd), NOT a Linux system user
# WARNING: -c overwrites the file: omit it when adding subsequent users
sudo htpasswd -c /etc/nginx/.htpasswd git

# set secure permissions for the credentials file
sudo chown root:www-data /etc/nginx/.htpasswd
sudo chmod 640 /etc/nginx/.htpasswd

# reload nginx to apply authentication configuration
sudo systemctl reload nginx
Access control scope
This setup uses a single shared credentials file for all repositories.
Any authenticated user can clone and push to all repositories.
📤 Pushing first commit
The git repository needs to be cloned before pushing the first commits.
Clone the server git repository on a client machine then push a commit to the server.
# clone the git repository located on the server
git clone https://git.domain.fr/repository.git

# push first empty commit
git commit --allow-empty -m "initial release"
git push origin main
🪝 Configure Git Hook
Git hooks are scripts triggered by Git events.
When certain actions occur (such as a push), Git checks the repository’s hooks directory and executes the corresponding script if it exists.
In this setup, a server-side post-update hook will run after a successful push to the bare repository.
🔁 Create Git hook
The post-update hook runs once after all references have been updated on the server.
# enable post-update hook
mv post-update.sample post-update

# executable by owner (www-data runs it via fcgiwrap) and group only — never "others"
sudo chmod 0770 post-update