🖥️ Windows 11 Optimization & Customization

📖 Introduction
This guide provides practical steps to reduce RAM usage, extend battery life, and remove unnecessary Windows 11 services and AI components. By applying these tweaks, you can streamline your system, improve performance, and customize Windows 11 to better suit your needs.
⚡ Hardware Optimization
⚙️ Power & Performance Optimization Settings
Setting Maximum processor state to 99% on battery disables Turbo Boost, so the CPU runs only at its base clock speed. This reduces power consumption and heat, extending battery life, with only minor performance loss for most everyday tasks.
Control Panel > Hardware and Sound > Power Options > Edit Plan Settings

Change advanced power settings
  PCI Express
    Link State Power Management
      On battery: "Maximum power savings"
      Plugged in: Off
  Processor power management
    Minimum processor state
      On battery: 2%
      Plugged in: 5%
    Maximum processor state
      On battery: 99%
      Plugged in: 100%
🔋 Extend Surface Pro Battery life
Your battery will charge to 80%. This mode extend battery health and lifespan.
Open Surface application.
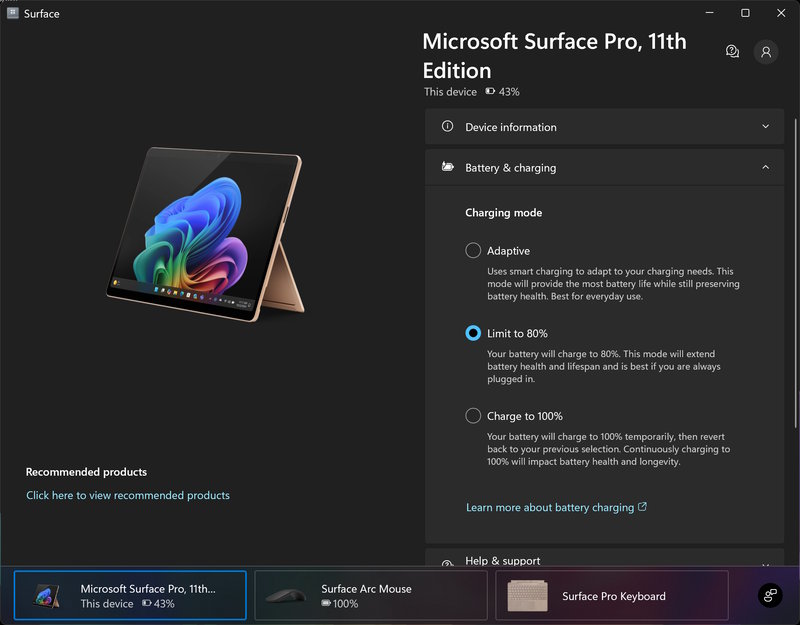
Battery & charging: Limit to 80%
🧹 Windows Cleanup Scripts
📦 Win11Debloat
Win11Debloat is a simple, easy to use and lightweight PowerShell script that helps streamline Windows 11 by removing bloatware, disabling telemetry, and improving privacy and performance:
- Open PowerShell or Terminal, as an administrator.
-
Copy and paste the command below into PowerShell:
& ([scriptblock]::Create((irm "https://debloat.raphi.re/"))) -RunDefaults -
Wait for the script to automatically download Win11Debloat.
- Carefully read through and follow the on-screen instructions.
🤖 Remove Windows Ai
This script disables Windows 11 AI features, removes related packages, and cleans up system data.
- Open PowerShell or Terminal, as an administrator.
-
Copy and paste the command below into PowerShell:
& ([scriptblock]::Create((irm "https://raw.githubusercontent.com/zoicware/RemoveWindowsAI/main/RemoveWindowsAi.ps1"))) -
Wait for the script to automatically download Win11Debloat.
- Carefully read through and follow the on-screen instructions.
🗑️ Disk Cleanup
Disk Cleanup is a built-in Windows utility that helps free up disk space by removing unnecessary files.
- Press Win + R:
cleanmgr. - Select Clean up system files.
-
Check:
- Windows Update Cleanup
- Microsoft Defender Antivirus
- Downloaded Program Files
- Temporary Internet Files
- Direct X Shader Cache
- Delivery Optimization Files
- Device driver packages
- Language Resource Files
- Recycle Bin
- Temporary files
-
Click OK → Delete Files.
🛠️ DISM System Cleanup
DISM (Deployment Imaging Service and Management Tool) is a built-in Windows utility for advanced system maintenance.
It can clean up the WinSxS folder by removing outdated Windows Update files. Using the /ResetBase option, DISM also deletes older component versions permanently, freeing additional disk space but preventing the uninstall of old updates.
- Open PowerShell or Terminal, as an administrator.
-
Copy and paste the command below into PowerShell:
dism.exe /online /Cleanup-Image /StartComponentCleanup /ResetBase
🛠️ Windows Customization
⚡ Install PowerShell
Install the latest version of PowerShell using the Windows package manager.
& "$env:LOCALAPPDATA\Microsoft\WindowsApps\winget.exe" install Microsoft.PowerShell --override '/quiet ADD_FILE_CONTEXT_MENU_RUNPOWERSHELL=1'
🖱️ Add PowerShell Context Menu Entries for .ps1 Files
By default, Windows includes a “Run with PowerShell” context menu option, but this is limited to Windows PowerShell 5.x. It does not provide an option to execute scripts using PowerShell 7.
The following configuration adds a context menu entry to allow running scripts directly with PowerShell 7.
# Requires Administrator privileges
if (-not ([Security.Principal.WindowsPrincipal][Security.Principal.WindowsIdentity]::GetCurrent()).IsInRole([Security.Principal.WindowsBuiltInRole]::Administrator)) {
    Write-Error "This script must be run as Administrator."
    Read-Host "Press Enter to exit"
    exit 1
}

# Mount HKCR: drive (not available by default)
if (-not (Get-PSDrive -Name HKCR -ErrorAction SilentlyContinue)) {
    New-PSDrive -Name HKCR -PSProvider Registry -Root HKEY_CLASSES_ROOT | Out-Null
}

$base = 'HKCR:\SystemFileAssociations\.ps1\Shell\CascadeMenu\Shell'

# --- Remove old entries ---
Remove-Item 'HKCR:\Microsoft.PowerShellScript.1\Shell\PowerShell7x64' -Recurse -Force -ErrorAction SilentlyContinue
Remove-Item 'HKCR:\SystemFileAssociations\.ps1' -Recurse -Force -ErrorAction SilentlyContinue

# --- Recreate base keys ---
New-Item 'HKCR:\SystemFileAssociations\.ps1'       -Force | Out-Null
New-Item 'HKCR:\SystemFileAssociations\.ps1\Shell' -Force | Out-Null

# --- CascadeMenu (top-level "PowerShell" submenu) ---
$cascade = 'HKCR:\SystemFileAssociations\.ps1\Shell\CascadeMenu'
New-Item $cascade -Force | Out-Null
New-ItemProperty $cascade -Name 'MUIVerb'     -Value 'PowerShell'                               -PropertyType String -Force | Out-Null
New-ItemProperty $cascade -Name 'Icon'        -Value 'C:\Program Files\PowerShell\7\pwsh.exe'   -PropertyType String -Force | Out-Null
New-ItemProperty $cascade -Name 'SubCommands' -Value ''                                         -PropertyType String -Force | Out-Null

# --- 0. Run with PowerShell 7 ---
$key = "$base\0.PowerShell7.Run"
New-Item $key -Force | Out-Null
New-ItemProperty $key -Name 'MUIVerb'      -Value 'Run with PowerShell 7'                     -PropertyType String -Force | Out-Null
New-ItemProperty $key -Name 'Icon'         -Value 'C:\Program Files\PowerShell\7\pwsh.exe'    -PropertyType String -Force | Out-Null
New-ItemProperty $key -Name 'CommandFlags' -Value 0x20                                         -PropertyType DWord  -Force | Out-Null

New-Item "$key\Command" -Force | Out-Null
$cmd = 'C:\Program Files\PowerShell\7\pwsh.exe -Command "$host.UI.RawUI.WindowTitle = ''PowerShell 7 (x64)''; & {Set-ExecutionPolicy -Scope Process Bypass}; & \"%1\" "'
Set-ItemProperty "$key\Command" -Name '(Default)' -Value $cmd

# --- 1. Run with PowerShell 7 as Admin ---
$key = "$base\1.PowerShell7.Run.Admin"
New-Item $key -Force | Out-Null
New-ItemProperty $key -Name 'MUIVerb'      -Value 'Run with PowerShell 7 as Admin'            -PropertyType String -Force | Out-Null
New-ItemProperty $key -Name 'Icon'         -Value 'C:\Program Files\PowerShell\7\pwsh.exe'    -PropertyType String -Force | Out-Null
New-ItemProperty $key -Name 'HasLUAShield' -Value ''                                           -PropertyType String -Force | Out-Null

New-Item "$key\Command" -Force | Out-Null
$cmd = 'C:\Program Files\PowerShell\7\pwsh.exe -WindowStyle Hidden -Command "& {Start-Process pwsh.exe -ArgumentList """-ExecutionPolicy Bypass -File \"\"%1\"\"""" -Verb RunAs} "'
Set-ItemProperty "$key\Command" -Name '(Default)' -Value $cmd

# --- 2. Run with PowerShell 5 ---
$key = "$base\2.PowerShell5.Run"
New-Item $key -Force | Out-Null
New-ItemProperty $key -Name 'MUIVerb'      -Value 'Run with PowerShell 5'                                              -PropertyType String -Force | Out-Null
New-ItemProperty $key -Name 'Icon'         -Value 'C:\Windows\System32\WindowsPowerShell\v1.0\powershell.exe'          -PropertyType String -Force | Out-Null
New-ItemProperty $key -Name 'CommandFlags' -Value 0x20                                                                  -PropertyType DWord  -Force | Out-Null

New-Item "$key\Command" -Force | Out-Null
$cmd = 'C:\Windows\System32\WindowsPowerShell\v1.0\powershell.exe -Command "& {Set-ExecutionPolicy -Scope Process Bypass}; & \"%1\" "'
Set-ItemProperty "$key\Command" -Name '(Default)' -Value $cmd

# --- 3. Run with PowerShell 5 as Admin ---
$key = "$base\3.PowerShell5.Run.Admin"
New-Item $key -Force | Out-Null
New-ItemProperty $key -Name 'MUIVerb'      -Value 'Run with PowerShell 5 as Admin'                                    -PropertyType String -Force | Out-Null
New-ItemProperty $key -Name 'Icon'         -Value 'C:\Windows\System32\WindowsPowerShell\v1.0\powershell.exe'         -PropertyType String -Force | Out-Null
New-ItemProperty $key -Name 'HasLUAShield' -Value ''                                                                   -PropertyType String -Force | Out-Null

New-Item "$key\Command" -Force | Out-Null
$cmd = 'C:\Windows\System32\WindowsPowerShell\v1.0\powershell.exe -WindowStyle Hidden -Command "& {Start-Process PowerShell.exe -ArgumentList """-ExecutionPolicy Bypass -File \"\"%1\"\"""" -Verb RunAs} "'
Set-ItemProperty "$key\Command" -Name '(Default)' -Value $cmd

# --- 4. Edit with ISE ---
$key = "$base\4.PowerShell.ISE"
New-Item $key -Force | Out-Null
New-ItemProperty $key -Name 'MUIVerb'      -Value 'Edit with ISE'                                                          -PropertyType String -Force | Out-Null
New-ItemProperty $key -Name 'Icon'         -Value 'C:\Windows\System32\WindowsPowerShell\v1.0\powershell_ise.exe'          -PropertyType String -Force | Out-Null
New-ItemProperty $key -Name 'CommandFlags' -Value 0x20                                                                      -PropertyType DWord  -Force | Out-Null

New-Item "$key\Command" -Force | Out-Null
$cmd = 'C:\Windows\System32\WindowsPowerShell\v1.0\powershell_ise.exe "%1"'
Set-ItemProperty "$key\Command" -Name '(Default)' -Value $cmd
💤 Disable Hibernation
Disable hibernation to free up disk space (removes hiberfil.sys).
To turn off hibernation on Windows 11:
- Open an elevated Command Prompt (Run as Administrator)
- Execute the following command:
powercfg -h off
Note: You can re-enable hibernation at any time with
powercfg -h on.
🔐 Enable Automatic Login
Configure Windows 11 to automatically sign in and bypass the password/PIN screen at startup.
- Go to Windows → Settings → Accounts → Sign-in options
- Disable "For improved security, only allow Windows Hello sign-in"
- Press Win + R
- Type
netplwizand press Enter - Uncheck "Users must enter a user name and password to use this computer"
- Click Apply
- Enter your password when prompted (stored securely for auto-login)
- Click OK, then restart your PC
⌨️ Disable Keyboard Layout Switching
Prevent accidental keyboard layout changes by disabling system hotkeys.
- Go to Windows → Settings → Time & Language → Typing → Advanced keyboard settings
- Click on "Language bar options"
- Open the Advanced Key Settings tab
- Set all input language hotkeys to "None"
- Click OK to apply changes
🖼️ Remove Shortcut's arrow
Remove the shortcut arrow overlay from desktop icons by editing the Registry:
-
Open Registry Editor
Press Win + R, typeregedit, and press Enter. -
Go to:
HKEY_LOCAL_MACHINE\SOFTWARE\Microsoft\Windows\CurrentVersion\Explorer\Shell Icons -
Create String Value
- New → String Value
- Name: 29
- Value:
%windir%\System32\imageres.dll,197
-
Restart to apply changes.
⚡ Use High Performance Power Plan
Optimize system performance by enabling the High Performance power plan and adjusting advanced settings.
- Open the Control Panel
- Go to Hardware and Sound → Power Options
- Select High performance
- Click Change plan settings
- Click Change advanced power settings
Processor power management
    Minimum processor state: 0%
    Maximum processor state: 100%

PCI Express
    Link State Power Management
        Setting: Off
🔌 Disable Fast Startup
Disable Fast Startup to ensure your system boots from the USB installation media. You may need to access the BIOS/UEFI settings to change the boot order.
Option A: From Windows (Shift + Restart)
- Open the Start menu
- Hold the Shift key
- Click Power → Restart
- Navigate to Use a device or UEFI Firmware Settings to select the USB drive
Option B: From Windows 11 (UEFI Firmware Settings)
- Open Settings
- Go to System → Recovery
- Under Advanced startup, click Restart now
- Select Troubleshoot → Advanced options → UEFI Firmware Settings
- Click Restart to enter BIOS/UEFI
⚙️ Optimize System Protection & Remote Access
Disable unnecessary background features to save disk space and reduce system overhead.
Go to Windows → System → Advanced system settings
Disable System Protection to avoid unnecessary restore points and reclaim disk space.
- Select your system drives and disable them
- Click Configure
- Choose Disable system protection
- Set Max Usage to 0%
- Click Delete to remove existing restore points
- Click Apply then OK
Disable remote access features for improved security.
- Uncheck "Allow Remote Assistance connections to this computer"
- Select "Don’t allow remote connections to this computer"